

You can install balloon arch covers with ease, even if you just started your diy balloon arch journey. Grab your diy supplies and get ready for a fun project. This tutorial helps you create a diy balloon arch that stands out at any event. Balloon arch covers slip on quickly, so you spend less time worrying and more time decorating. > Try these tips and watch your diy balloon arch come together with almost no stress.
Balloon Arch Covers Setup
Materials and Tools
Before you start, gather everything you need for your balloon arch covers project. Having the right supplies makes the process smooth and fun. Here’s a handy list to keep you on track:
High-quality latex balloons in different sizes (5", 10", 12", and 18") for a fuller look
Foil mylar balloons for extra shine and a modern touch
Balloon decorating strips or balloon tape to hold your balloons together
Balloon arch kit for convenience—these kits often include balloon tape, glue dots, hooks, and string
Balloon pumps (manual or electric) to save your breath and time
Balloon stands or wire frames for support
Command hooks or adhesive wall clips for easy mounting
Zip ties for extra security when attaching balloons or covers
Glue dots or tape runners to fill gaps and secure balloons
Optional: fresh or faux flowers, greenery, ribbons, or LED lights for decoration
Pro tip: A balloon arch kit saves you time and makes sure you have all the basics in one box.
Arch Stand Positioning
Set up your arch stand before you add any balloons. Place the stand where you want your balloon arch to be. Make sure the base feels steady. If you use a balloon arch kit, follow the instructions for assembling the frame. You can use zip ties to connect parts of the frame or to anchor the stand to a heavy object. This keeps your balloon arch from tipping over. Check that the arch stand is tall and wide enough for your space. Move it around until you find the perfect spot.
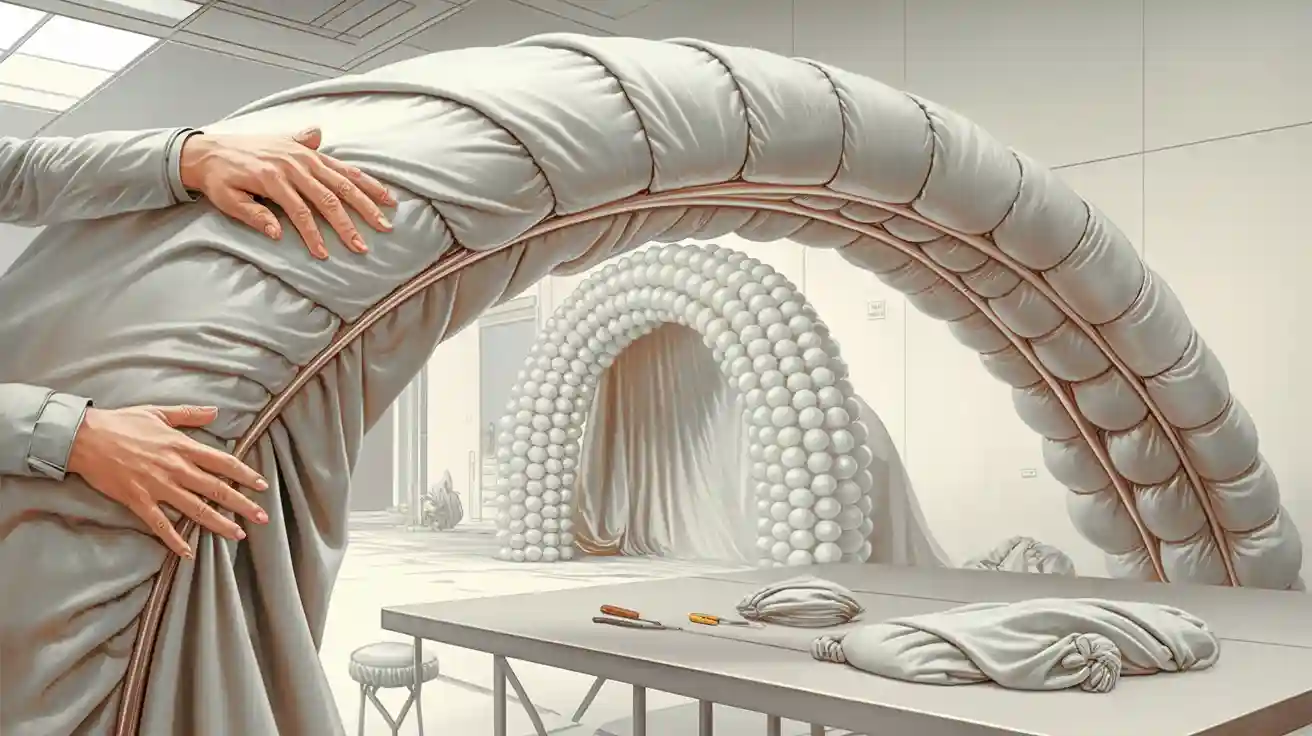
Cover Placement
Now it’s time to add your balloon arch covers. Slide the cover over the frame gently. Smooth out any wrinkles as you go. If the cover feels loose, use zip ties or tape to tighten it at the bottom or sides. Make sure the cover fits snugly so it looks neat. Once the cover is in place, you can start attaching your balloons. Use balloon tape or glue dots to secure each balloon. If you see any gaps, fill them with smaller balloons or decorations from your balloon arch kit. Step back and check your work. Adjust the cover or balloons as needed for a perfect finish.
DIY Balloon Arch Preparation
Workspace Organization
You want your diy balloon arch project to run smoothly. Start by clearing a space where you can spread out all your supplies. Keep your balloon garland kit, balloons, pumps, and tools within reach. Use a table or a clean floor area. Lay out your balloon garland strips and covers so you can see everything. If you work with friends or family, assign each person a task. One person can inflate balloons while another arranges the balloon garland. This teamwork makes your diy balloon arch come together faster.
Tip: Place a trash bag nearby for popped balloons and scraps. You’ll keep your workspace tidy and avoid stepping on balloon pieces.
Balloon Inflation Timing
Timing matters when you inflate balloons for your diy balloon arch. Don’t rush to blow up all the balloons at once. Inflate your balloon garland balloons a few hours before you start building. This helps them stay fresh and firm. If you use latex balloons, they last longer indoors. Mylar balloons hold their shape for days. You can inflate a few test balloons to check the size and color. Mix different sizes to give your balloon garland a fuller look. If you want to save time, use an electric pump. You’ll finish your diy balloon arch faster and with less effort.
Arch Strip Hanging
Hanging your balloon garland strip is a key step in diy balloon arch prep. You should hang the strip a few days before your event. This lets it uncurl and makes it easier to work with. Find the center loop by sliding the strip through your hand. Secure the strip to your arch frame using zip ties at the center and corners. Add extra zip ties with balloons beneath them on the frame posts. This keeps the strip from slipping. Start attaching balloons at the top center, which is the focal point of your balloon garland. Push the knotted end of each balloon through the strip openings. Alternate placement from front to back and switch up colors and sizes. Move side to side as you add balloons. This keeps your balloon garland balanced and eye-catching. Hang the strip in a cool spot away from sunlight and heat. Your diy balloon arch will look fresh and last longer.
Balloon Garland Prep Checklist |
Done? |
|---|---|
Workspace organized |
✅ |
Balloons inflated |
✅ |
Arch strip hung |
✅ |
Installation Steps
Attaching Balloons
Ready to bring your balloon arch to life? This part of the tutorial shows you how to attach each balloon for a full, balanced look. You want your balloon garland to look professional, so follow these steps and tricks:
Inflate your balloons in batches. Use different sizes and colors for a fun style. Don’t over-inflate or under-inflate.
Find the center of your balloon arch strip by sliding it through your hand. Look for the center loop.
Use zip ties to attach the strip to the frame at the corners. This keeps your balloon arch centered and steady.
Start at the top of the arch. Push the knotted end of each balloon through the larger hole in the strip. Slide it into the smaller hole to lock it in place.
Alternate adding balloons from the front and back of the strip. Switch up the colors and sizes as you go.
Move side to side while you add balloons. This trick helps keep your balloon garland balanced.
Add zip ties to the sides of the frame. Place a balloon just below each zip tie to stop the strip from sliding.
Use glue dots or tape to add small balloons in empty spots. This tip fills gaps and makes your balloon garland look full.
Pro tip: Use rubber bands or clamps if you need extra hold. These tricks help when you want to add balloons in tricky spots.
Securing the Cover
You want your balloon arch covers to look smooth and tight. This part of the tutorial gives you easy tips for a neat finish:
Slide the cover gently over the frame. Start at one end and pull it across.
Smooth out wrinkles with your hands as you go. Work from the center out to the edges.
If the cover feels loose, use zip ties or tape at the bottom and sides. This trick keeps the cover snug.
For extra security, use clamps at the base or corners. These hold the cover in place during your event.
Check that the cover lines up with the frame. Adjust as needed before you add balloons.
Note: The balloon strip helps keep everything stable. It spaces your balloons evenly and makes your arch look sturdy.
Adjusting Fit
Sometimes you need to make small changes to get the perfect look. This tutorial section shares tricks for adjusting your balloon arch and garland:
Step back and look at your balloon arch from different angles. Spot any sagging or uneven spots.
Gently pull the cover tighter if you see wrinkles. Use extra zip ties or tape to hold it.
Shift balloons along the strip to fill bare spots. Add balloons with glue dots or tape for a fuller look.
If the arch strip slips, add another zip tie or clamp. Place it near a balloon for extra grip.
Adjust the arch height and alignment by moving the frame or changing the hook positions.
Tip: Don’t be afraid to move things around. Small tweaks make a big difference in your final display.
A sturdy balloon garland and a smooth cover make your balloon arch stand out. Use these tricks and tips from the tutorial to get a professional look every time.
Balloon Tips for a Fuller Look
Alternating Sizes and Colors
Want your balloon garland to look extra full and eye-catching? Try mixing different balloon sizes and colors. Start with large balloons as your base. Add medium balloons around them. Fill in gaps with small 5-inch balloons. This layering creates a balloon garland that pops with depth and volume. Pick two or three main colors that match your party theme. Alternate these colors as you build your balloon garland. This trick keeps your arch balanced and lively. Slightly underinflate your balloons so they stay round and don’t pop. Step back every so often and check your balloon garland from different angles. You’ll spot empty spaces and can adjust your balloons for a fuller look.
Tip: Use premium balloons with bright colors. They make your balloon garland stand out and last longer.
Building Clusters
Clusters are the secret to a thick, textured balloon garland. Group three to five balloons together in different sizes. You can make quad clusters by tying four small balloons together. Tuck these clusters into your balloon garland to fill gaps and add dimension. Start with the largest balloons, then layer clusters of mixed sizes. Finish by adding small balloons in empty spots. This method gives your balloon garland a professional finish. You’ll notice your arch looks more dynamic and less flat. Try these tricks and see how your balloon garland transforms.
Cluster Building Steps |
Result |
|---|---|
Group balloons by size |
More depth |
Tie quad clusters |
Fills gaps |
Layer clusters |
Adds texture |
Fill with small balloons |
Fuller look |
Hiding Clips
Clips, zip ties, and hooks help hold your balloon garland together, but you don’t want them to show. Hide these supports by placing balloons directly over them. Use small balloons to cover clips at the base or sides. You can also tuck clusters around hooks and zip ties. If you see a clip peeking out, add a balloon or a bit of greenery. These tricks keep your balloon garland looking neat and seamless. Your guests will only notice the beautiful arch, not the supports behind it.
Tip: Step back and scan your balloon garland for any visible clips. Make quick fixes before your event starts.
Troubleshooting
Wrinkles and Sagging
Wrinkles and sagging can make your balloon arch look messy. You want your balloon garland to stand out, so start with a high-quality spandex cover. These covers stretch tightly over the arch frame and keep everything smooth. You don’t need clips or pins because the fabric hugs the frame. If you see creases, pull the cover gently from the edges. Spandex covers stay wrinkle-free and keep their shape, even after you use them many times. You can wash and reuse them for future balloon garland projects. For a professional look, make sure the arch frame is clean and smooth before you add the cover. Sand rough edges and use tensioning tricks to keep the fabric tight. Your balloon arch will look polished and ready for any party.
Tip: Always check the cover from different angles. A quick adjustment can fix most sagging spots.
Loose Covers
Loose covers can ruin the look of your balloon garland. If the cover slips or bunches up, use zip ties or clamps at the base and sides. These tools hold the cover in place and stop it from moving. You can also use strong tape for extra grip. Make sure the cover fits snugly around the arch frame. If you see extra fabric, tuck it under the frame or secure it with a small knot. Spandex covers work best because they stretch and stay tight. You want your balloon arch to look neat, so take a minute to double-check the fit before you add balloons.
Problem |
Quick Fix |
|---|---|
Loose cover |
Zip ties, clamps |
Extra fabric |
Tuck or knot |
Cover slipping |
Strong tape |
Balloon Attachment Issues
Balloon attachment problems happen a lot when you build a balloon garland. Sometimes balloons drift away or shift during your event. You can stop this by anchoring balloons to the arch frame with balloon clips, adhesive hooks, or strong tape. For outdoor parties, use weighted bases to keep your balloon garland steady. Balloons can pop or fall off if you don’t secure them well. Always check that each balloon is locked into the strip or tied tightly. If you see gaps, fill them with small balloons using glue dots. You want your balloon garland to stay full and stable, so don’t rush this step.
-
Common balloon attachment issues:
Balloons drifting or shifting
Balloons popping or falling off
Decor instability
-
Solutions:
Use balloon weights or anchors
Secure balloons with clips, tape, or hooks
Fill gaps with extra balloons and glue dots
Remember: A sturdy balloon garland makes your arch look amazing and lasts all day.
Final Touches
Decorative Elements
You can make your balloon arch stand out with a few creative touches. Try mixing balloon sizes to add texture and depth. This trick gives your arch a lively look. Many people love adding natural elements like fresh flowers or leafy branches. These details bring a modern and elegant vibe to your display. If you want something extra special, use fabric drapes or ribbons. They add softness and movement.
Want your arch to glow at night? LED-lit balloons create a magical effect and light up your event. Some parties use branded balloons to match the theme or encourage guests to share photos online. If you care about the environment, choose eco-friendly, biodegradable balloons. These options help you celebrate while staying green.
You can also make your arch interactive. Set up a spot where guests can attach messages or signatures to the arch. This idea gets everyone involved and makes your event memorable.
Add flowers, foliage, or fabric for elegance
Use LED-lit balloons for evening events
Include branded balloons for themed parties
Choose eco-friendly balloons for sustainability
Create interactive arches for guest engagement
Tip: Step back and look at your arch before the party starts. Small changes can make a big difference.
Safety Checks
Safety matters when you finish your balloon arch. If you use a helium tank, always follow the instructions to keep everyone safe. You want your arch to stay up all day, so test everything before guests arrive.
1. Test adhesive hooks on the wall or surface. Make sure they stick well and won’t fall off. 2. Ask a friend to help position the arch. Two people can move it safely and avoid accidents. 3. Attach the arch with zip ties, string, or fishing line. Check that everything feels tight and secure. 4. Gently shake the arch. If it wobbles, add more ties or adjust the hooks. 5. Step back and check for balance. Move balloons or clusters to fill gaps and even out the shape. 6. Test any string lights or electrical accessories. Make sure they work and are safe to use.
Note: Always double-check your setup before the event starts. A sturdy arch means you can relax and enjoy the party.
You can make a diy balloon arch if you follow these easy steps. First, clean your workspace and get all your diy supplies ready. Pick the right cover so your arch looks smooth. Many event hosts say this job is simple and not stressful when you stay neat and talk with your team.
Try your diy skills and pick good materials for the best look.
Use the same steps each time and trust good suppliers to help your diy balloon arch look great.
If you plan ahead, making a diy balloon arch will be fun and everyone at your event will love it.


